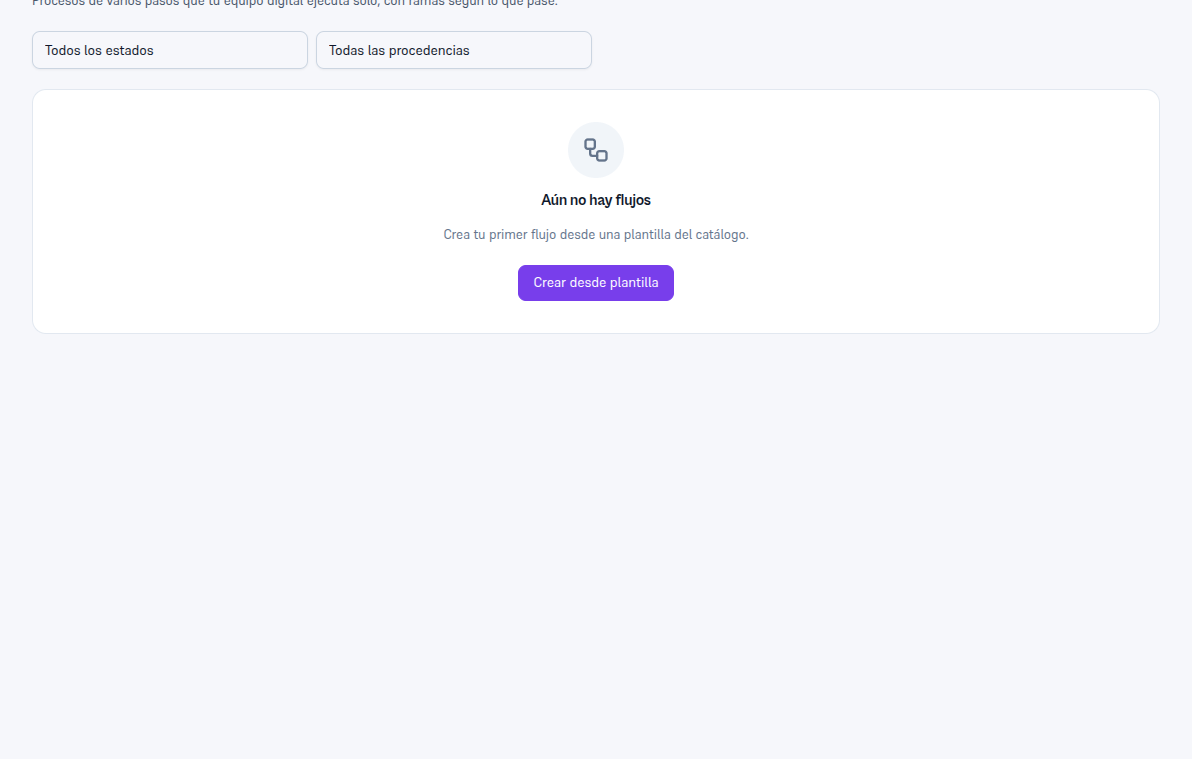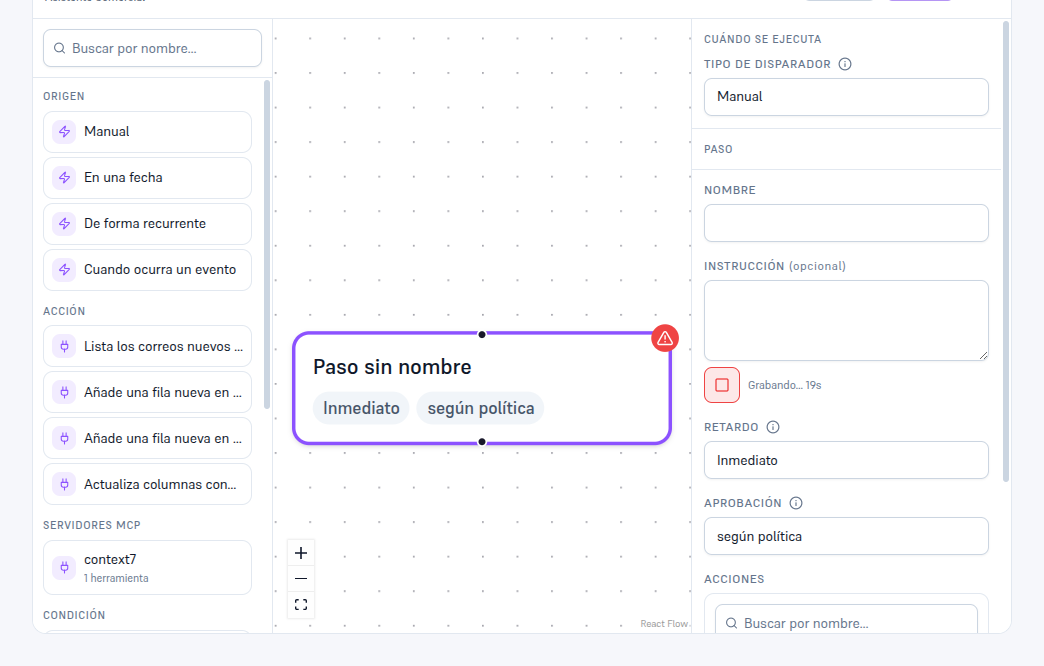
Go into Flows, in the sidebar. A flow is a multi-step process your digital team runs on its own — and, unlike a stand-alone task, it can branch: at a decision step the flow follows one path or another depending on whether a condition is met. It’s not a linear list of steps, it’s a small decision tree.
3.1 Create a flow
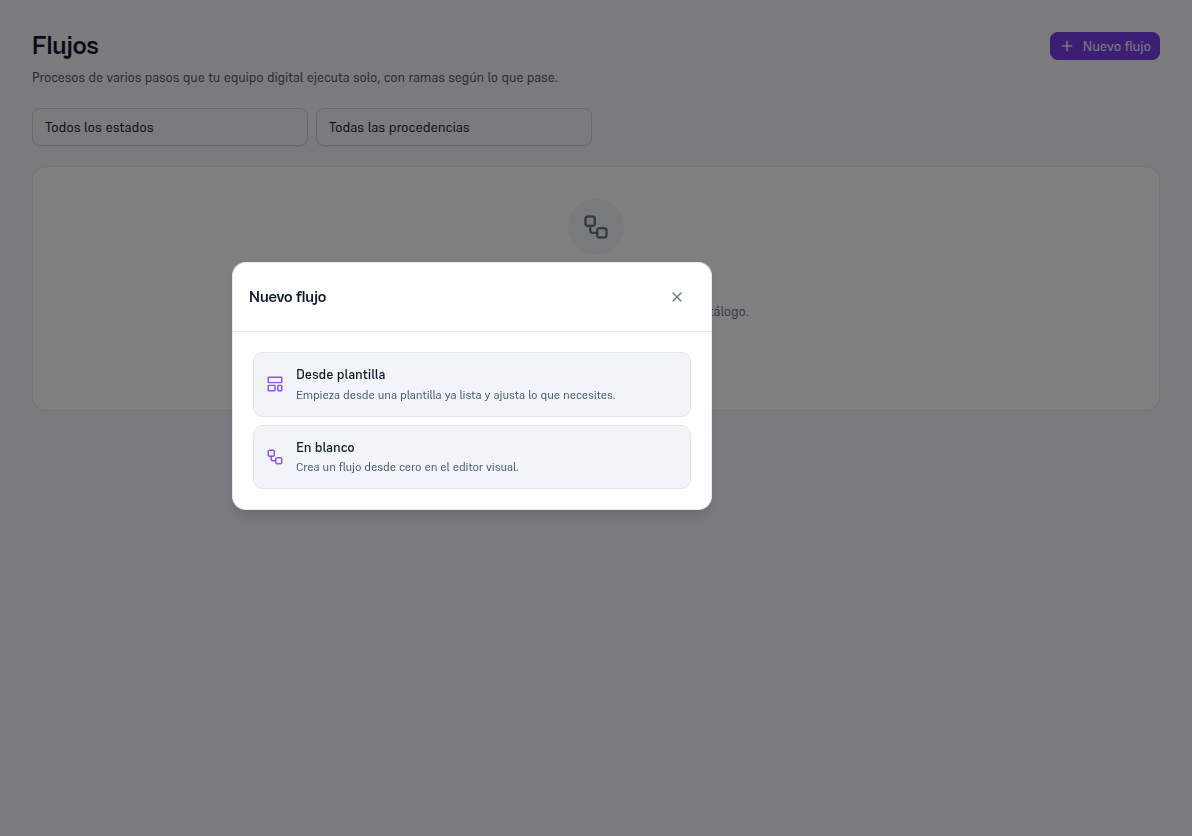
Section titled “3.1 Create a flow”Requirements: Admin or Editor role. Press “New flow” and choose one of two paths:
- From a template: you pick a ready-made template from the catalog (with its steps and, sometimes, a decision already included), name it, choose the agent that will run it, and fill in whatever data the template asks for. It’s the fastest path — the one the CASE in section 4 uses.
- Blank: you just set a name and an agent, and build the steps yourself from scratch in the visual editor.
3.2 A flow’s record
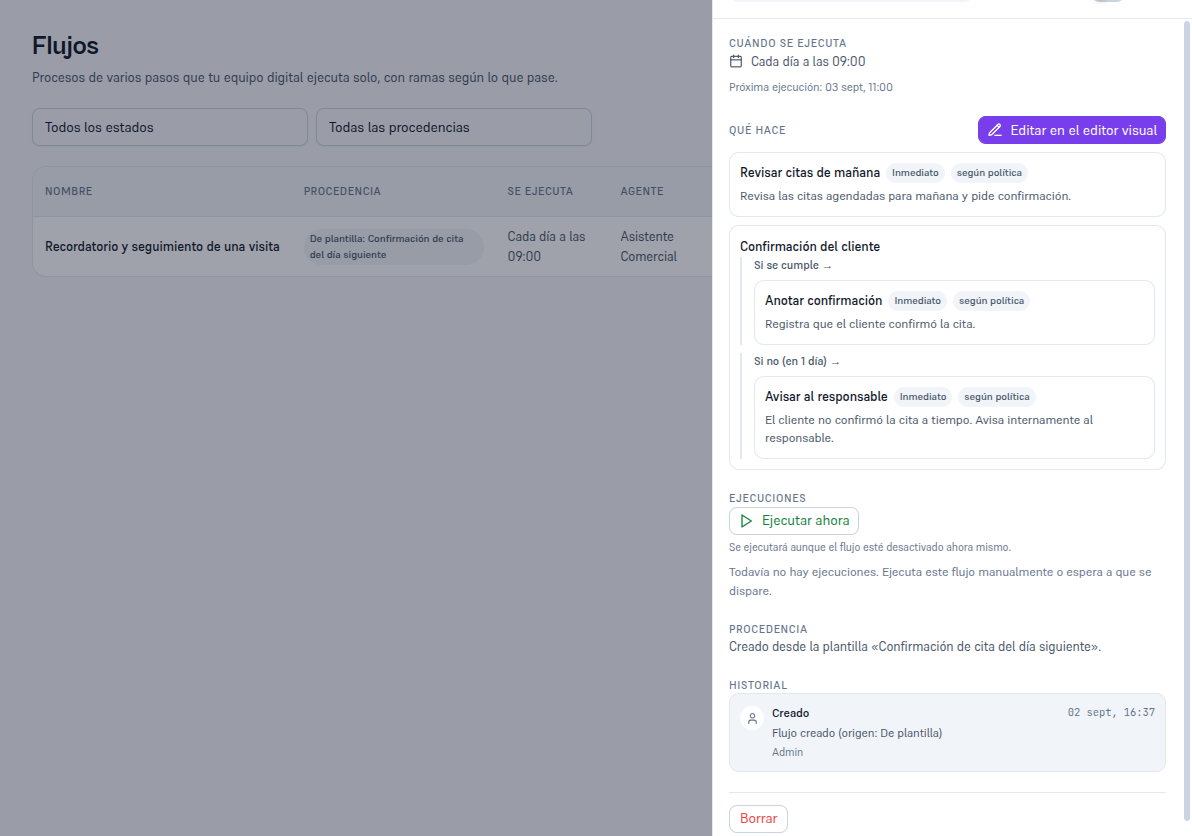
Section titled “3.2 A flow’s record”Once created, its record opens, with these sections:
- When it runs: its trigger, in plain language (“every day at 09:00”, “when a new contact comes in”…) and its next run if it has a date.
- What it does: a read-only summary of its steps, with the “Edit in the visual editor” button to open the canvas (section 3.3).
- Runs: the list of times it has run, with the “Run now” button to launch it by hand at any time (works even if the flow is disabled — useful for testing it).
- Origin: where it came from — by hand, from a specific template, or by instruction (you asked your assistant for it in chat and it generated it — same treatment as one built by hand, equally editable).
- History: every change to the flow itself (created, activated, updated…).
The active toggle, next to the name, decides whether the flow fires on its own when its turn comes. An inactive flow can still be run by hand with “Run now”, to test it before switching it on.
3.3 The visual editor (builder) and the piece palette
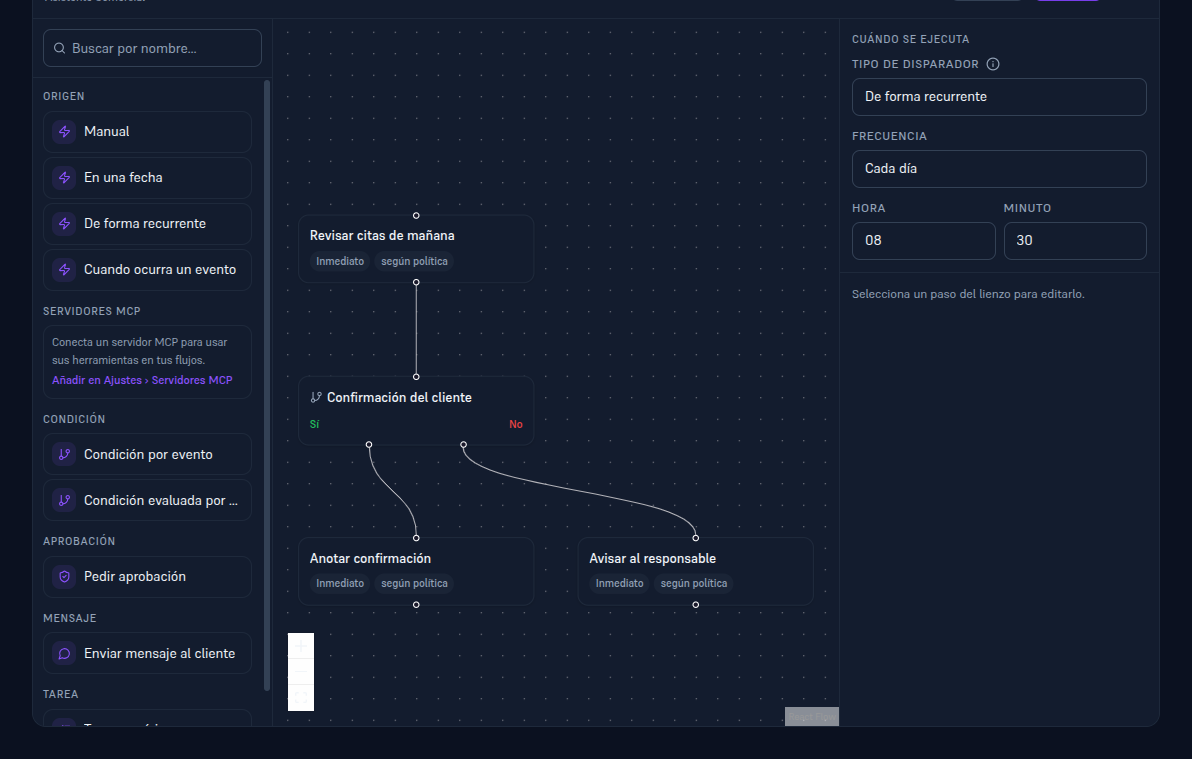
Section titled “3.3 The visual editor (builder) and the piece palette”It’s a canvas with the flow’s steps as cards connected by arrows. On the left is the piece palette — searchable by name, grouped into fixed categories — and on the right, a panel with two parts: “When it runs” (the flow’s trigger, always visible) and, once you select a card on the canvas, that card’s own settings.
Every new step is added by picking its piece from the palette — on desktop, with a click or by dragging it onto the canvas; on mobile, the palette is a plain list, one tap is enough. There’s no generic card to fill in afterwards: each piece already comes with its own fields, ready to configure as soon as you add it (section 3.4). The categories, always in this order:
| Category | What you’ll find |
|---|---|
| Origin | The flow’s 4 triggers: Manual, On a date, Recurring, When an event occurs — the same trigger you always see under “When it runs”. |
| Action | One piece per action you’ve enabled on a connection visible to this flow — a spreadsheet, a folder, a mailbox… (section 3.5 and Manual 61). |
| Condition | A decision with two outputs (Yes/No): “Event-based condition” (free, fires instantly) or “Assistant-evaluated condition” (has an AI cost) — section 3.6. |
| Approval | “Request approval”: the step waits for someone on the team to confirm it. |
| Message | “Send a message to the customer”. |
| Task | “Generic task” (an instruction with no automatic action attached) and “Repeat for each item” (section 3.7). |
Below “Origin” there’s a separate section, “MCP servers”: if you have any MCP server connected in Settings, a piece appears here per server, with its active tools — if you don’t have one yet, a direct link takes you to connect it (Manual 60 “MCP servers” covers that whole screen).
3.4 The inspector: each piece’s own fields
Section titled “3.4 The inspector: each piece’s own fields”As soon as you add or select a piece, the right-hand panel automatically generates its own fields — never a generic form or an uppercase technical key: every field carries its label in your language and, when needed, a hint underneath. Depending on the kind of data the piece asks for, you’ll see a different control:
- A choice from a closed list → a dropdown.
- Text or a number → a single-line box (or a multi-line one if the data is long).
- Yes/No → a toggle.
- A group of related data (for example, a condition’s rule) → a sub-group with its own frame, inside the same panel.
- A list of name → value pairs (for example, which data goes in which column of a sheet) → a row editor, with ”+ Add row” to add more.
- A list of loose bits of text → “chips”: you type and press Enter or comma to add each one, with an × to remove it.
- Something more advanced these controls don’t cover yet → a technical configuration box (JSON) — you’ll never see it empty with the word “null”: if nothing is configured, the box itself says so (“Not configured yet”).
Note — The “Task” piece can also be dictated by voice
The long text field of the Task piece (section 3.3, “an instruction with no automated action attached”) carries the same microphone button as the “New task” form (section 2.2): press it, speak for up to 60 seconds, and the dictated text appears LITERALLY in the field, editable before you save the flow — it never saves on its own. If the dictation service isn’t available in your environment, the notice just says so (“We couldn’t connect to the dictation service”), instead of faking a transcription.
3.5 A piece’s connection
Section titled “3.5 A piece’s connection”Any Action piece that talks to an external integration (a spreadsheet, a folder, a mailbox, an MCP server…) needs to know which connection to use. That field is called “Connection” and it always shows the connection’s name and its scope — “shared” or “this flow only” — never a technical identifier. If you only have one valid connection for this piece, it’s picked automatically; if you have several, you choose from a closed dropdown.
Below the field there’s a “Manage connections” link that takes you straight to Integrations, to that specific integration’s connections screen — Manual 61 “Named connections and invoices by email” covers that whole screen: creating, renaming, scoping to one flow, or revoking a connection.
Note — If the “Connection” field doesn’t show a name yet
“Loading…” means the real name is on its way — wait a moment. “Connection unavailable” means that connection no longer exists (it was revoked, or belongs to another flow) — choose another one from the dropdown itself or from “Manage connections”.
3.6 A two-branch condition
Section titled “3.6 A two-branch condition”When you add a Condition piece the node comes with two outputs already drawn on the canvas — “Yes” and “No” — which you connect by dragging from each point on the card to the next step. The piece you chose in the palette fixes how it’s checked: once added, you no longer switch it from “event-based” to “assistant-evaluated” from the inspector — for that, delete the step and add the other Condition piece instead.
If you chose “Assistant-evaluated condition”, the panel shows: name, the comparison rule (which data to check, the condition, and the value), a description of the condition, how often it’s re-checked, and the maximum deadline — once that deadline passes without the condition being met, the flow follows the “No” branch (or is marked failed if that branch doesn’t exist). Nothing is saved until you press “Save”, top right.
3.7 Repeat a step for each item
Section titled “3.7 Repeat a step for each item”Some Origin/Action pieces don’t produce a single result but a list — for example, “Read new emails” returns the list of messages received since last time. To process each item of that list separately (read EACH email, extract its data, save it…), add the “Repeat for each item” piece — it’s in the Task category of the palette, next to “Generic task”.
A batch is simply “everything that needed processing in this run”: each item in the batch spawns its own child job — with its own record, its own history and its own approval (section 2.6) — that runs the SAME series of steps, once per item. If one item fails, the rest of the batch carries on completely normally: one unreadable email never stops the rest of the inbox.
Its fields:
- Item to repeat: the earlier step that produces the list — the dropdown only offers steps that genuinely return a list (for example, “Read new emails”); if you don’t have one yet, a notice tells you so.
- Item identifier: the field of each item that uniquely tells it apart (for example, the message identifier) — this is what stops the same item being processed twice if the flow runs again.
- Cap per run and Daily cap: the maximum number of items processed at once — section 3.9.
- If an item fails: which alert step to use when one specific item fails — section 3.9.
Adding the piece also opens its own sub-canvas — “Steps to repeat” — where you build the series of steps that runs once per item, with the SAME palette and the SAME inspector as the main canvas. Inside this sub-canvas, the “Use a value from an earlier step” selector (section 3.4) offers an extra option, “Current item”, to reference a field of the item currently being processed — on top of the sub-canvas’s own earlier steps and the main flow’s steps that ALWAYS run before “Repeat for each item”.
When you save the flow, the editor itself checks that every reference inside the sub-canvas points to a real step and field — if something no longer checks out (for example, you deleted the source step), the notice tells you exactly which step and field to review before letting you save. A repetition can’t contain ANOTHER repetition nested inside — to process lists within lists, split the work into two flows.
3.8 A run’s record
Section titled “3.8 A run’s record”Every time a flow runs — by hand or by its trigger — it generates its own run record, with its status and a step-by-step timeline: what it did, how, and what’s next. Open it from the “Runs” list on the flow’s record.
Three sections: path taken (what’s already happened, step by step, with a link to each one’s task), path on the graph (the same drawing as the editor, with the stretch already covered highlighted), and full history (every technical event of the run). A run in progress can be cancelled at any time.
If the flow has a repetition step, its run record gains two more things:
- A “Repetition: parent run” indicator in the header, and a summary — visible as soon as the first item finishes — with the count per status: Total, Done, Failed, Awaiting approval, Skipped (by a cap, section 3.9) and Timed out (items that had been waiting too long — section 3.9).
- An item list, one row each, with its own identifier and its own status (Pending / Done / Failed / Skipped / Awaiting approval) and a direct link — “View run” to THAT item’s own record (which opens just like this one, marked “Repetition: item”, with its own path taken and history), or “Go to the approval queue” if it’s waiting on your review (section 2.6).
3.9 Bounds and alerts
Section titled “3.9 Bounds and alerts”So a very active mailbox (or any very long list) never overwhelms a single run, every repetition has closed bounds — never “unlimited” — and alerts you when it reaches them.
| Bound | What it limits | What happens when it’s exceeded |
|---|---|---|
| Cap per run (default 50, maximum possible 200) | How many items are processed in ONE run of the flow. | The items left over wait for the next run — nothing is lost, it’s just spread across more than one trigger. |
| Daily cap (optional; one of these figures: 100, 250, 500 or 1000 — 500 if you don’t pick one) | How many items THIS step processes in one calendar day, adding up all its runs. | The items left over that day are marked “Skipped” (never spawn a child job) until the next day, and you get a notice with how many were skipped. |
How long the parent run waits: the run record (section 3.8) waits up to 4 hours for every item in a batch to finish before closing the summary with whatever it has — an item still running past those 4 hours ends up “Timed out” in the summary. This does not apply to an item that’s awaiting your approval: a human decision is in no hurry — it gets up to a full week before being marked expired, and the run’s summary updates itself the moment you finally resolve it (even days later).
Note — The “backlog” alert rings once per episode
If a repetition step hits its per-run cap three times in a row (for example, a mailbox that always receives more than 50 new emails), the bell notifies you once: “This step has hit the item limit several runs in a row.” From then on, the alert doesn’t repeat while the streak continues — ringing on every single run would be noise, not new information. If the step later has a run below the cap (the mailbox catches up) and then hits the cap three times again, that’s a new streak and the alert rings again — you’re never left in the dark by an old streak.
If you’d also like the team to hear about it when one specific item fails (beyond the notice that it’s listed as “Failed”), add an alert step under “If an item fails” (section 3.7) — you can choose “Notify the team” (a bell, plus email if you have that turned on) or “Log to history” (no alert, just a record). If several items fail in a row with the same alert, you get a single notification with the count — never one bell per failure.
Note — Attachment names are cleaned up
When a step works with an email’s attachment (for example, inside the “Invoices by email” template, Manual 61), the name the message carries can include invisible or misleading characters — the sender controls it entirely, and it isn’t always trustworthy. Before showing it to you or using it as the real name of the file uploaded to your sheet/folder, the system cleans it up (strips invisible characters, right-to-left override marks, and any ”..” or path attempt) and, if nothing usable is left after cleaning, uses a reserve name —
attachment, orattachment-1,attachment-2… if the same email carries several nameless attachments — so two different attachments never get confused with each other.